Sunday 30 December 2012

Pistachio fancies


This recipe comes from the January 2013 edition of Olive magazine.  As soon as I saw it I promoted it to the top of the baking order – it uses Lindt balls, pistachios and fondant icing...what’s not to love?  In my old age, I find all-over fondant icing can be a bit sickly so I liked the idea of drizzling it rather than submerging the cakes in it a la Mr Kipling.


The sponge is a wonderful green thanks to the pistachios; if there’s a better coloured nut I’ve not seen it!  They also keep the sponge moist so these cakes will keep for several days (that’s the theory, anyway  - I won't get to find out with this batch!)


I’d not used fondant icing sugar before and made the glaze how I would a normal icing sugar glaze.  I soon realised this was a mistake – the fondant icing stays runny for much longer and is thinner than it looks in the mixing bowl.  Make it much thicker than you normally would and then marvel at how it oozes down the cakes – it’s like magic!


The white chocolate Lindt ball topping is genius and works really well.  Any white chocolate truffle would suffice but the little demi-sphere looks so cute.  Both Mr CC and I are a sucker for Lindor so any excuse to buy a box is most welcome!


Well, this is the final post of the year – I’ll be honest, it’s a year I’ll be glad to see the back of so here’s hoping 2013 is a good one!  Happy New Year to all my lovely readers!


Ingredients

For the sponge:
100g pistachio kernels
150g golden caster sugar
150g unsalted butter, at room temperature
3 eggs
150g self raising flour
2 tablespoons milk, you may possibly need more
8 white chocolate Lindt Lindor balls, cut in half

For the icing:
300g fondant icing sugar
water – the amount will vary but start with 2 teaspoons


Method

Preheat the oven to 190°/fan oven 170°C/375°F/gas mark 5.

Line a 20cm square cake tin with baking paper.

Put the pistachios in a food processor and blitz until you have even, small pieces.

Add the sugar and blitz again.

Add the butter and pulse until you have a thick paste.

Add the eggs and flour and blitz until you have a smooth batter.

If the batter is not at dropping consistency, add the milk and pulse.  Test again and add more milk until you have the right consistency.

Spoon into the prepared cake tin and level the surface.

Bake for approximately 20 minutes or until a skewer inserted into the cake comes out clean.  Mine took about 22 minutes.

Leave to cool – in the tin – on a wire rack for 15 minutes then lift out of the tin and leave to cool completely on the wire rack.

When cool trim the edges from the cake – this ensures that each cake cube will look the same.

Cut the cake into 16 squares and place them, a little distance apart, on the wire rack.  Make sure there is a large square of foil or baking paper under the wire rack – it should be slightly bigger than the rack in order to catch all spills!

Cut each Lindt ball in half (they have a central join seam and if you use that you will get clean halves).

Place each half on top of a cube of cake.

Now make the icing: place the fondant icing sugar in a bowl and beat in 2 teaspoons of water.  Fondant icing sugar is different to ordinary icing sugar and I found it paid to make the glaze much thicker than I normally would –it stayed runny for longer so you need it thicker to hold on to the cake!

Spoon the icing over the cakes ensuring that the Lindt balls are covered.  It will run down the sides, which is why it’s important to make it a thick glaze – you don’t want it all to end up on the foil.

Place each cube of cake into a paper case – at this point I put them in the fridge for 20 minutes to firm up the glace.  They don’t need to be kept in the fridge beyond that.

Bask in the glory of the wonderful thing you have created.

Eat.

Sunday 23 December 2012

Gingerbread cupcake Christmas trees with salted caramel buttercream


As someone who doesn’t like ‘traditional’ Christmas baking such as mince pies, Christmas cake or pudding, I have looked further afield for my own favourite traditional flavours – and decided that ginger is top of the list.  Any spice is perfect for winter but ginger always seems warmer and spicier than the others...not that I don’t love them too.


These cupcakes mix traditional with modern due to the addition of salted caramel in the buttercream.  I like my salted caramel more caramel than salt – it’s the hit of sweetness just tempered by salt that tickles my taste buds.  Obviously, we all make things to suit our own palate, so feel free to add more salt or entirely omit it if it’s not your thing.  The cakes will be lovely whichever path you choose.


I’d seen the idea of stacking cupcakes into a tree on a website selling silicon cases for the job.  However, you only got three of each size...who can exist on three cupcakes?  (Even huge cupcakes like these!)  So I decided to adapt it to foil cases and make a forest! 


Gingerbread and salted caramel is a lovely combination and not one I’d considered putting together before.  Surprisingly, given the huge amount of sugar in the buttercream, it doesn’t taste too sweet.  It also helps that – because of the stacking – each cupcake gets only a ring of buttercream rather than a huge pile.


When the lovely people at Tala asked if I’d like to try out some of their products my answer was – of course – a resounding yes!  Tala has a special place in my affections; the CCM (Caked Crusader’s Ma) didn’t have much baking equipment but she did have a set of Tala cockolly cutters which she used to make pie decorations from spare pastry.  Her set probably dates from the 1960s and it’s incredible that the flimsy cardboard box still survives:


 I decided to use the lovely snowflake cutters as the lid for my mince pies this year...and I think they look rather good!


This is my last blog post before Christmas so all that remains is to wish everyone an extremely happy and tasty Christmas!


Ingredients

For the gingerbread:
210g unsalted butter – at room temperature
300g golden caster sugar
90g black treacle
90g golden syrup
3 eggs plus 3 egg yolks
450g plain flour
2 teaspoons ground ginger
1 teaspoon ground nutmeg
3 teaspoons baking powder
360ml full fat milk – warmed gently

For the buttercream:
190g caster sugar
6 tablespoons cold water
120ml double cream
½ teaspoon salt (or to taste)
1 ½ teaspoons vanilla extract
240g salted butter – at room temperature
300g icing sugar
Dr Oetker natural green food colouring gel


Method

Preheat the oven to 190°C/fan oven 170°C/375°F/gas mark 5.

Line two 12 hole cupcake pan with cases – you’ll need 16 of each size case.  If you have a mini cupcake pan use this for the mini cupcake cases.  For the truffle case sized cases, simply place on a baking sheet.  If you use foil cases they will hold their shape.

Beat together the butter and sugar until smooth, creamy and light.  At first it will seem like this will never happen – but persist!  It may take five or ten minutes depending on how soft the butter was.

Beat in the treacle, golden syrup, eggs and egg yolks until well combined.

Weigh out the flour and add the spices and baking powder to it.

Stir in half the flour mix to the butter mixture.

Stir in half the warmed milk.

Stir in the remaining flour, followed by the remaining milk taking care to ensure the batter is well mixed.

Spoon into the prepared cases.

Bake the larger cupcakes for 20-25 minutes.  You can risk baking all the different sizes together but you might disturb the larger cakes when you open the oven to remove the small ones.

Bake the medium cupcakes for approximately 15 minutes or until well risen and a skewer inserted into the cakes comes out clean.

The smallest need only about 10 minutes.
Leave to cool on a wire rack.

Now make the caramel: place the caster sugar and water in a saucepan (a silver one is best as you can monitor the colour better) and heat gently until the sugar has dissolved.  Shake the pan to mix the ingredients rather than stir – stirring can make the sugar crystallise and produce a grainy caramel.

Increase the heat and cook, swirling the pan occasionally, until the caramel has turned golden and thickened a little.

Remove the pan from the heat and stir in the cream.  It may spit a bit so be prepared for it – I wore my oven gloves so my hand didn’t get burned.

Stir in the salt and vanilla and leave to cool.  Taste it (when cool enough to do so safely) to gauge the salt.  It should be a smidge too salty at this point because the saltiness will be greatly reduced when you beat it into the butter and sugar.

It must be completely cool before you make the buttercream.

Beat together the butter and sugar until it is light and fluffy – it will look almost whipped.  It will be a little thicker than is normal at this point but don’t fret, the caramel will soften it.

Beat in the caramel.

Beat in enough green colouring to tint the buttercream.

Spoon into a piping bag and – if the buttercream is particularly soft – pop it into the fridge for 5 minutes.

Now build the Christmas trees: push a cocktail stick into the centre of a large cupcake.  Skewer a medium sized cupcake onto it.  Take another cocktail stick and skewer the smallest cupcake to the medium one - cut the sticks to size so nothing is poking out the top.  It is best to do this before piping as it’s cleaner!

Now pipe the buttercream in small points over all the visible gingerbread to replicate a Christmas tree.

Decorate with sprinkles and baubles.

Bask in the glory of the wonderful thing you have created.

Eat.

Sunday 16 December 2012

Profiteroles


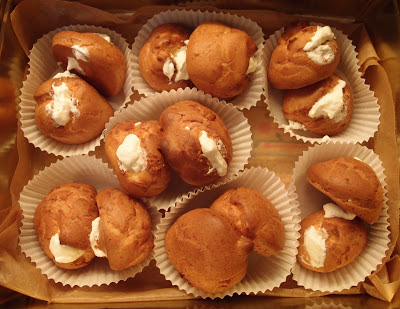
Having said only last week that I didn’t want to be faffing around making a croquembouche in the run up to Christmas, this week I found myself making choux pastry...me and my big mouth!  However, I didn’t make a tower and left my little buns at the profiterole stage.


I’d never made choux before and it’s become a long running joke between Mr CC and me that whenever I ponder what to make he says, ‘choux’ before adding that I can’t consider myself a proper baker having never attempted it (he certainly knows how to goad me!).  So I attempted it.  I did what I always do in times of kitchen troubles...turn to Delia.  Her profiterole recipe interested me because she says to spoon the choux onto the baking sheet rather than pipe it.  I realised why when my choux was so runny it fell off the spoon without any encouragement.  Shamefully, I started to doubt Delia and question her recipe.  See how runny it was:


But I should know better by now than to doubt Delia.  Of course they worked just fine and puffed up into pretty little balls.  For the Fanny Cradock fans out there I am happy – and proud - to report that there was no goo.


Delia’s recipe fills the profiteroles with whipped cream, which is lovely, but I decided on a halfway house between cream and crème pat with my cheaty custard cream filling.  It really is yummy and tastes like so much more work than merely adding some pre-made custard into whipped cream.  Here they are just after I piped the cream into them.  I found using a metal nozzle allowed good control to stuff that little bun full:


What struck me with choux is how much you get for so little.  Look at the quantities in the ingredients listings – they’re tiny, yet I got a good 22 profiteroles from it.  I was surprised at how quick they were to make too.


Of course, the only concern I have now is what will replace Mr CC’s choux-demands?  I only hope it’s something easy!


Ingredients

For the choux:
60g plain flour
1 level teaspoon caster sugar
150ml cold water
50g unsalted butter – cut into small cubes
2 eggs, beaten

For the cream:
300ml whipping cream
300g vanilla custard – the good quality, ready made stuff from the supermarket chiller cabinet

For the chocolate:
225g chocolate – I used a mix of milk and plain


Method

Preheat the oven to 200°C/fan oven 180°C/400°F/gas mark 6.

Line two baking sheets with baking paper or non stick foil.  Grease very lightly.

Tear off a sheet of baking paper or foil and lay it flat on the work top.  Sift the flour and sugar on to it – you must do this now so it is ready for when you need it.

Place the water and butter in a saucepan and melt together over a medium heat.  Stir.

As soon as the butter is melted and the temperature is reaching boiling, remove from the heat and tip in all the flour and sugar.

Beat like mad (I used an electric whisk) until the paste is smooth and a unified ball that leaves the side of the pan.

Beat in the eggs gradually until you have a thick glossy paste.

Flick some water onto the baking sheets – this will create steam and help the pastry to rise.

Spoon teaspoonfuls of choux onto the baking sheet leaving a 2cm gap between the buns.

Bake for 10 minutes and then increase the heat to 220°C/fan oven 200°C/425°F/gas mark 7 and bake for a further 15-20 minutes or until the buns are crisp, light and golden.

Pierce the side of each bun to allow the steam to escape and leave to cool.

For the filling I whipped the cream and then added the custard a spoon at a time.

Cut a slot in each bun and pipe or spoon the filling into the cavity.  Do this as close to serving as possible because the cream will soften the pastry.

Melt the chocolate in a bowl over a pan of simmering water taking care that the bowl does not touch the water.

When melted, remove from the heat and allow to cool a little before spooning over the profiteroles.

Serve immediately. (NB. I did put mine in the fridge and you lose the gloss on the chocolate but they’re perfect otherwise).

Bask in the glory of the wonderful thing you have created.

Eat.

Monday 10 December 2012

No-faff chocolate truffle cheesecake


Christmas is fast approaching and, much as we all like to spend October and November fantasising about the joyful expressions on our family’s faces when we bring a 3 foot tall croquembouche to the Christmas table, by December reality has kicked in and the croquembouche recipe is tucked away not to be looked at again until maybe next November.


This is where recipes like this earn their keep – delicious, minutes to prepare and – with the right presentation – wow factor.  Lakeland very kindly sent me their small hemisphere pans to try and I knew I wanted to make something that looked like Christmas pudding but wasn’t (I’m not a fan).  Chocolate cheesecake was the answer (when isn’t it?) and this one is perfect for a special occasion because it tastes like chocolate truffles with a cheesecake tang.  I’m sure you could use it for a truffle filling – it’s that good!


These are the hemisphere pans – if you use two, you can join them to make a perfect ball.  It’s an optical illusion, the pan on the left looks so much bigger but it honestly isn’t!


The joy I feel when Lakeland ask me to sample stuff can only be expressed with the following analogy: just conjure up that feeling you get when the boy/man you have that outlandish unrequited crush on at school/college/work/wherever talks to you, knows your name and is really friendly.  That feeling.  Lakeland like me!  My love is no longer unrequited!  Joy!


I lined my hemisphere mould with cling film to ease the turning out process.  It does mean that you don’t get the perfect smooth finish but many a good pud can be ruined by a messy turn out, so for me it was a worthy compromise.  To make the clingfilm adhere better to the metal, I rubbed a thin coat of oil on first.  Even with that prep, I still needed to give the tin a quick dip in warm water to encourage the cheesecake out, as it sets firm.


Because this recipe is so simple, it really does live or die by the quality of the chocolate you use – pick a chocolate you like eating because that will be the overriding taste of the finished cheesecake.


If my hemisphere pan was the equivalent of Lakeland knowing my name and being friendly, then the hamper can only be the equivalent of a bouquet of flowers.  I think I might be dating Lakeland.  I love a good hamper – and this is a goodie.  All killer no filler (as I believe the phrase goes).  It contains tea, jam and biscuits (Mr CC has developed a passion for the strawberry and clotted cream shortbread) and the hamper itself is a wicker teacup and saucer.  So often with hampers I’m left with a nice box that doesn’t seem to have a purpose; not this one.  I had already bought my Christmas poinsettia and the teacup (lined with foil to stop leakage) made an instant container - how cute does it look?


As you have probably guessed my cake tin and hamper were provided by Lakeland.  Regular readers will know that I have long worshipped at the altar of Lakeland - and diverted large and regular chunks of my salary in their direction - so please don’t think I’m promoting Lakeland just cos I got some freebies...my love for them is genuine, deep and rather moving.


Ingredients

The quantities set out below will make a 20cm round springform tin cheesecake or two of the Lakeland small hemisphere pan cheesecakes.  If you are making a classic cheesecake, make the base first, then the topping.  If a hemisphere cheesecake, topping first, then base.

For the cheesecake:
300g milk chocolate
100g dark chocolate
300g cream cheese – I used Philadelphia
200g mascarpone

For the base:
175g digestive biscuits
75g unsalted butter


Method

Line two 13cm Lakeland hemisphere tins with clingfilm – a light rub of oil helps the clingfilm adhere to the metal.

Stand the moulds in dishes so they are stable.

Place the chocolate in a bowl and sit above a pan of simmering water, taking care that the bowl does not touch the water.  Leave to melt slowly – no need to fuss over it or stir it.

Put the cream cheese and mascarpone in a mixing bowl and beat together.

Beat in the melted chocolate.

Spoon into the prepared moulds and level the surface; the cheesecake should not come to the top of the tin as you need room for the biscuit base.

Now make the biscuit base: place the biscuits and butter into a food processor and blitz until you have the texture of wet sand.  If you prefer, you can place the biscuits in a bag and crush manually with a rolling pin.  Melt the butter and stir the crumbs into it.

Spoon onto the cheesecake and ensure it is evenly spread.

Cover the base (which is currently the top) with clingfilm then place a plate with a weight on it.  This will press everything down and ensure it holds its shape on turning out.

Refrigerate (with the plate and weight still in place) for at least 2 hours or – ideally – overnight.

Turn out onto the serving plate.  A quick dip in hot water will encourage it out, if needed!

Spoon a dollop of thick cream on top and then decorate with a holly – voila!   Cheesecake pudding!

Serve in generous wedges with extra cream.  If you want the true chocolate truffle sensation serve it straight from the fridge.

Bask in the glory of the wonderful thing you have created.

Eat.

Sunday 2 December 2012

Famous Faces’ Favourite Fancies – Rainbow cake


I didn’t realise it at the time, but there was a definite theme, particularly for the ladies I wrote to for my Famous Faces’ feature.  I can only describe it as they all are women I would be delighted to sit down, share a pot of tea and cake, and have a right good natter with.  Therefore, it’s no surprise that I wrote to world famous author Jilly Cooper.


I love Jilly Cooper – I hope she won’t mind me calling her a true English eccentric (I mean it as a compliment – they are always my favourite people!) and an animal lover.  She’s also written moreinternational bestsellers than I’ve had hot dinners (NB.  That is a lie.  I am not known for skipping hot dinners.  I am using hyperbole to indicate that she has written lots of books!) I’m sure you will have heard of them ...particularly if you were a teenager in the late 1980s and desperate to read something a little racy (how we struggled in those pre-internet years!).  Riders?  Rivals? The Man Who Made Husbands Jealous? Polo?  Admit it...you’ve read at least one!


Jilly sent me a lovely response in which she reminisced about something called Rainbow cake that she had enjoyed during the (second world) war years.  She remembered it being pink, yellow and golden brown and described it as fascinating and haunting her, not least because she couldn’t imagine its ingredients during rationing!  I had a hunt for this recipe but found nothing, so hope that Jilly will be pleased with a modern rainbow cake.  I’ve wanted to make one of these for a while but the necessity of food colouring put me off, until I found the Dr Oetker natural gel colours.


I used disposable foil tins to bake my cakes and it meant I could prepare them all together rather than bake two cakes, wash the tins, bake the next two etc.  They came out well.  I kept the layers of sponge thin to stop it becoming the world’s tallest cake, but it still came out large...but as long as it fits on a cake plate, I consider it acceptable!


You might all have realised this yourself and roll your eyes as I share my latest discovery, if so, pretend I’m not the last person on the planet to work this out: tall cakes are a nightmare to cut and the layers can slide.  This is a cake that’s kept in the fridge – because of the cream cheese frosting – so cut slices straight from the fridge as the cold cake is far more stable and rigid.  Put the cut slices on their serving plates and let come to room temperature.  I can’t believe I’ve been baking every weekend for over seven years and have only just thought about doing that!  Oh well, better inspiration strike late than never......


Even the crumbs of rainbow cake are pretty:


Ingredients
For the cake:
375g unsalted butter, at room temperature
330g caster sugar
2 teaspoon vanilla extract
6 eggs
120ml milk
450g self raising flour
Natural gel colours in red, orange, yellow, green, blue and violet – I used Dr Oetker gel colours
For the frosting:
270g unsalted butter, at room temperature
225g icing sugar
2 teaspoon vanilla extract
675g cream cheese – I used Philadelphia

Method
Preheat the oven to 180°C/fan oven 160°C/350°F/Gas mark 4.
Line six 20cm round disposable foil tins with a disc of baking paper.  If you have six loose bottomed sandwich tins then use those.
Weigh your empty mixing bowl.  I know this sounds weird but you will be glad of it later!
Start by making the sponge: Beat together the butter, sugar and vanilla until light and fluffy. Don’t skimp on this stage as this is when you get lots of lovely air into your sponge.
Beat in the eggs gradually, add some of the flour if it looks like it might curdle.
Beat in the milk.
Stir in the flour until the mixture is smooth and well combined.
Weigh your mixing bowl full of batter.  Deduct the weight of the empty bowl to find the weight of your batter.  Divide by six to find how much batter to allocate to each tier – this will ensure even layers.  This was my calculation:
Empty bowl – 789g
Bowl full of batter – 2,429g
Therefore batter weighs – 1,640 (i.e. 2,429-789)
Batter divided by 6 – 273g.  Each colour needs 273g of batter.
Weigh the batter out into six small mixing bowls – I used my cereal bowls.
Add the colours to each bowl – you will find you need more of some colours than other.  For strong colours like red and blue, I needed the whole tube.
Spoon into the prepared tins and level the surface.
Bake for approximately 15 minutes or until a skewer inserted into the centre of the sponge comes out clean. Another good sign is if the sponge is just pulling away from the edge of the tin.  I could only fit four tins in my oven at a time, I did the remaining two afterwards – there didn’t seem to be any issues from the batter sitting around.
Leave to cool completely.
Now make the frosting: beat together the butter and icing sugar in a large mixing bowl (I used my kitchenaid).

Beat in the vanilla extract.

Beat in the cream cheese, adding it a spoonful at a time, until your frosting is smooth and well combined.

Use about half the frosting to sandwich together the layers of sponge.  Make sure you get them in the right order – from the bottom up: violent, blue, green, yellow, orange, red.

Use the remaining frosting to cover the top and sides. 

Refrigerate until you wish to serve, ideally removing from the fridge about 30 minutes beforehand.  Here’s my top tip for getting a crisp slice from such a tall cake: take the cake from the fridge about 30 mins before you wish to serve and cut it while it’s cold.  Place the slices on plates and leave to come to somewhere between cool and room temperature.  It’s so much more stable to cut when cold.

Bask in the glory of the wonderful thing you have created.

Eat.