Sunday 29 April 2012

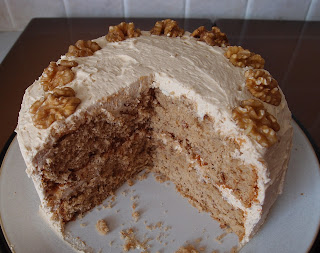
Coffee and walnut cake – a birthday cake


No one in my family much feels like big celebrations at the moment but it feels wrong to let birthdays go by without at least a cake.  The CCD (Caked Crusader’s Da) is partial to coffee cake and, when I gave him carte blanche to select his birthday cake flavour, it was – predictably – his first choice.


I don’t like coffee and what always surprises me is that when you say that to people (who like coffee), they will always respond with, “oh, but I bet you love the smell – that’s the best bit”.  Er, no.  It disgusts me just as much as the taste.  I don’t think people make that comment about any other food or drink; if you told someone you didn’t like garlic for example, they wouldn’t try and badger you into admitting you enjoyed its pungent aroma.


I stoked up the coffee element by using espresso coffee from Mr CC’s Nespresso machine.  I used 3 capsule’s worth of coffee spread across the cake and buttercream.  However, I know that most people probably don’t have this option so the recipe below sets out instant coffee quantities.  It does seem quite a ‘punchy’ cake and I think, from memory, uses more coffee than most similar recipes.


This cake is the classic combination of walnut and coffee.  Walnuts must have the best PR in the nut world as they have rather cornered the market in coffee based cakes and desserts.  I wonder how this monopoly came about but I suppose if it ain’t broke...


Happy birthday CCD!


Ingredients

For the sponges:

2 tablespoons instant coffee granules
2 tablespoons boiling water
175g unsalted butter, at room temperature
175g light muscovado sugar
3 eggs
175g self raising flour
100g walnuts, finely chopped

For the buttercream:

3 tablespoons instant coffee granules
3 tablespoons boiling water
175g unsalted butter, at room temperature
350g icing sugar
Handful of walnuts roughly chopped


Method

Preheat the oven to 180°C/fan oven 160°C/350°F/Gas mark 4.

Line two loose bottomed 20cm sandwich tins with baking paper.

Place the coffee granules in a small bowl and stir in the boiling water until you have no lumps left.  Put to one side to cool.

In a large bowl beat together the butter and sugar until light and fluffy.  Don’t skimp on this stage as this is where all the air gets into the mix.

Beat in the eggs one at a time, adding some of the flour if the mixture looks like it might curdle.

Stir in the flour and the chopped walnuts.

Stir in the cooled coffee.

Spoon into the two prepared tins, trying to make the distribution as even as possible.

Level the surfaces and bake for approximately 25 minutes or until a skewer inserted into the sponges comes out clean.

Place the cakes, in their tins, on a wire cooling rack and de-tin when they are cool enough to handle safely.  The leave to cool completely on the wire rack.

Now make the buttercream: As before, make up the coffee with the boiling water in a separate bowl and put to one side to cool.

In a large bowl beat the butter on its own until it is light and whippy.

Add the icing sugar and stir, at first manually, to incorporate.  When the icing sugar is mixed in you can use the electric mixer – taking this cautious approach stops your kitchen being dusted in a cloud of icing sugar!

Beat until light and whippy.  A good test is to take a small amount of the mixture and press against the roof of your mouth – if it feels grainy it needs more beating.

When smooth, add the coffee and beat until the coffee is evenly mixed into the buttercream. (If you’ve made up Nespresso capsules and have any coffee left over, simply brush it over the sponges – waste not, want not!)

Place one of the sponges on the serving plate and spread a scant 1/3 of the buttercream over it.

Place the other sponge on top and spread a similar amount on top of that.

Use the remaining buttercream to cover the sides of the cake.

Scatter the chopped walnuts on top for decoration.

Bask in the glory of the wonderful thing you have created.

Eat.


Sunday 22 April 2012

Famous Faces’ Favourite Fancies – Pineapple and chilli upside down cake


I have to confess, in most things, to being a fogey before my time, but particularly with music.  My radio is set to Absolute 80s where it shall stay until they set up Absolute 40s.  I’m more Andrews Sisters than Destiny’s Child, more Bing than Bieber...I’m sure you get the idea.


So, when a modern singer comes along who I really like it’s exciting for me – I get to buy CDs (sorry, I haven’t caught up with this new-found downloading of music yet) on the day they’re released; it reminds me of being young again.  (For the record, I am in my thirties...I know, I know, I sound about 70!)


Paloma Faith is such a talented woman –songwriter, singer, actress, style icon (with a nod to the vintage fashions of days gone by) and also incredibly witty and likable when interviewed.  And she’s from Hackney, just like Mr CC.  OK, I admit it – I totally have a girl crush on her!


Her debut album “Do You Want the Truth or SomethingBeautiful”  has been in my car stereo for so many months now that I think I could sing it in my sleep.  I can’t wait for the new album “Fall to Grace” which is out in May.


I’m also very excited that Paloma picked one of my favourite cakes – a pineapple upside down cake.  Then I hit a problem; I’ve made a pineapple upside down cake before and most pineapple upside cakes are pretty similar.  How could I make a cake different from the norm and worthy of Paloma?


This recipe was the perfect answer to my prayers.  I’ve been a slow and suspicious adopter of chilli into baked goods but this recipe tickled my taste buds.  The syrup that bakes on the bottom of the cake (and becomes the top on turning out) is spiked with chilli and lime meaning that the cake is infused with a sweet spiciness that is also fresh and light.


 The sweetness of the syrup takes all the sting from the chilli just leaving a sweet chilli taste; I think next time I might be tempted to leave a few chilli seeds in there as I do like my spice.  Apart from that, it was classic pineapple upside down cake all the way...i.e. extremely pleasant!


Ingredients
250g golden syrup
1 fresh red chilli – deseeded and chopped as finely as you can
Grated zest of 1 lime
430g tin of pineapple rings in juice (not syrup) – this is the weight of the whole tin, not the drained weight; keep the juice as it is used in the cake
225g unsalted butter, at room temperature
225g caster sugar
4 eggs
225g self raising flour


Method
Preheat the oven to 180°C/fan oven 160°C/350°F/gas mark 4.

Take a 20cm round springform tin and line the inside with foil, then a paper liner – if you have an all in one paper liner it will save you the stress of the syrup oozing out whilst baking.  I went for the belt-and-braces approach of foil and a liner and that worked fine.

Start by making the syrup: place the golden syrup, chilli and lime zest in a saucepan and heat, only for about2-3 minutes, until the syrup has loosened up.

Pour just over half the syrup into the prepared tin and swirl the tin around so the syrup is evenly distributed.

Place as many pineapple rings as you can in the syrup without overlapping them too much.  I got 6 in.

Now make the sponge: beat together the butter and sugar until light and whippy.  Don’t skimp on this stage.

Beat in the eggs, one at a time.

Stir in the flour and enough pineapple juice from the can to make a nice smooth dropping consistency.

Chop the remaining pineapple from the can and stir into the sponge batter.

Carefully spoon the batter into the tin taking care not to disturb the pineapple rings and syrup.
Spread the batter to the edges of the tin to try and seal in the syrup and stop it from bubbling up over the edges whilst cooking.

Stand the cake tin on a baking tray with lipped sides – just in case any syrup sneaks out during cooking!

Bake for approximately 45-55 minutes or until a skewer inserted into the cake comes out clean.  Mine actually took a bit longer – just over an hour.

Leave the cake to cool, in the tin, for 20 minutes then turn out i.e. invert onto a serving plate.  Tempting though it is to wait for the cake to cool completely before turning out, you run the risk of the syrup being glued onto the baking paper!

When you come to serve the cake, remember that you have just under half the syrup left – if you warm this gently it is very nice poured over the cake.

Serve the cake warm with ice cream or at room temperature with cream.

Bask in the glory of the wonderful thing you have created.

Eat.


Wednesday 18 April 2012

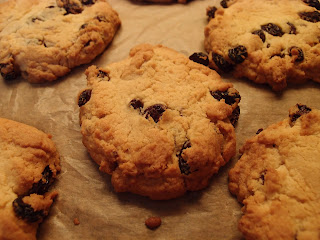
Rum and raisin biscuits


The wind and rain is howling outside, which I’m not complaining about as we need rain to alleviate our current drought conditions...but it is a bit grim; or to put it another way, it’s the perfect day to make delicious, comforting rum and raisin biscuits!


These biscuits are very quick to make as long as you remember that you need to soak the raisins ahead of time. With soaking fruit there is only one rule: the longer the better. Ideally I soak fruit overnight but here, I decided on a whim to make the biscuits so soaked for an hour.


The rum flavour is subtle and the texture of the biscuit is light and crumbly. As usual, I got half as many biscuits as the recipe suggested...I just can’t help myself! I think my tablespoons are twice the size of everybody else’s!


This is my first post back following the loss of the CCM (Caked Crusader’s Ma). I know that my blog is usually light and humorous (Readers: so now she tells us!) but I would like to be serious in my thanks to all of you for your lovely comments and emails. I was quite overwhelmed by your words of sympathy and will admit I cried at many of your beautiful messages. Thank you. Day to day life still feels empty and wrong at the moment but I’m hoping that trying to get back into a routine (blogging being a part of that) will help.


Ingredients

150g raisins
150ml rum – I used Mount Gay golden rum
225g unsalted butter, at room temperature
140g caster sugar
½ teaspoon vanilla extract
1 egg yolk
280g plain flour

Method

Soak the raisins in the rum for as long as possible – ideally overnight, but a minimum of an hour.

Preheat the oven to 190°C/fan oven 170°C/375°F/gas mark 5.

Line two baking sheets with baking paper.

Beat together the butter and sugar until smooth, light and whippy.

Beat in the vanilla and the egg yolk.

Beat in 3 tablespoons of rum from the raisin/rum bowl.

Drain the raisins, retaining any remaining rum.

Stir the flour and the raisins into the mixture. If the dough seems dry add a further tablespoon of the retained rum.

Take tablespoons of the dough and place them, about 3cm apart, on the baking sheets. I got 13 biscuits whereas the original recipe said approx 30.

Press down on the biscuits so they are flat. If they are too domed they will be cakey in texture rather than biscuity.

Bake for approximately 15 minutes if you got nearer to 30 biscuits, or up to 30 minutes if – like me – you got 13! You’re aiming for them to be golden and crumbly around the edges but still soft in the centre.

Leave to cool completely on the baking sheets before moving to an airtight container. You will find that they have crisped up and are no longer soft in the centre.

Bask in the glory of the wonderful thing you have made.

Eat.